 Last weekend I went to wonderful wedding where in addition to being a guest I set up a self-service photobooth for people to take their own pictures. This is a quick rundown on what worked, what didn't, and what I'd do differently. I'd never set up a self-serve thing before and overall I learned more about people and crowds than photography. :-)
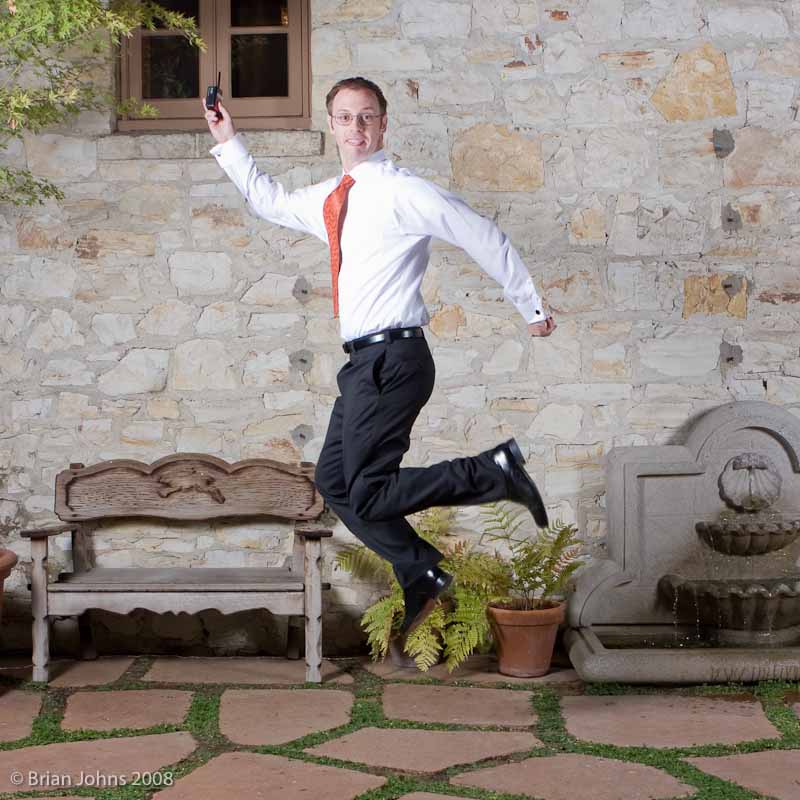
I've seen photobooths at events before and I was looking forward to setting one up. People inherently take different pictures of themselves when they're in control of the picture. Kids especially like to ham it up when they think they can get away with it and even adults act more spontaneous when there's not the pressure of a photographer telling them to ham it up.
In the simplest sense, a photobooth is just a camera on a tripod with a way to trigger it. Here was the list of requirements I laid out:
1) It has to be easy to use. People shouldn't have to do anything besides smile and push the button. People don't want to think.
2) It has to be able to run mostly unattended.
3) The images have to be high quality because people should be able to make some decent sized prints.
4) This was going to be set up in an outdoor courtyard from about 2:00pm until 9:00pm which means the ambient light went from bright to zero over the course of the day.
5) I wanted to be able to accommodate large groups of people.
6) I'd like to shoot at f/8 for sharpness and ISO 400 for noise in order to get the best quality out of the Canon 40-D.
7) The fewer wires running on the ground the better, since hordes of small children and drunken revelers might be running around with little supervision. That means wireless triggering.
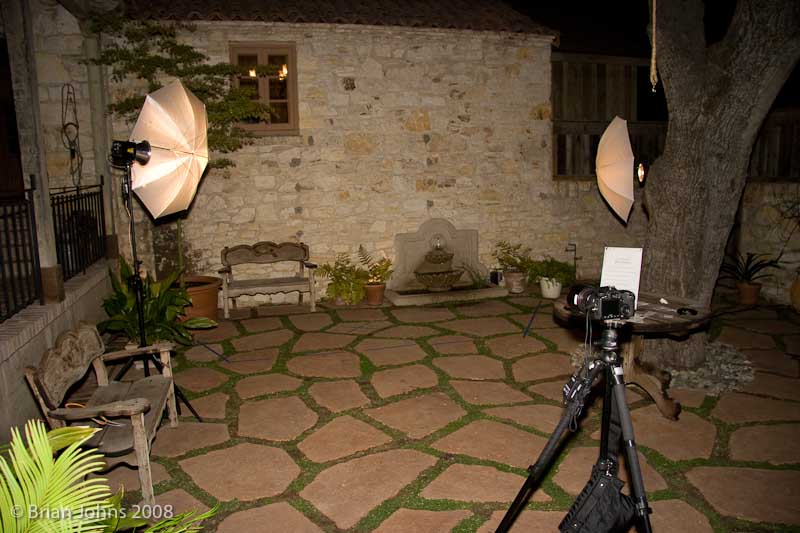
In order to get sharp pictures (especially outdoors, at night) some sort of flash is needed. In order to light groups of 10 people or so for a hours at a time I opted for plug-in studio flashes (Alien Bees) instead of speedlights like a Canon 580 EX II. That means no TTL metering, so we're shooting on manual mode with changing sunlight throughout the day. I ended up adjusting the exposure a couple times throughout the day and just metering with the histogram. The only real exposure problems were white shirts (and dresses) getting too close to one of the umbrellas which led to over exposure.
Everything was shot in RAW so there was a lot of latitude for post-processing. A total of about 600 shots were taken which worked out to about 7.5 GB of data.

Because I wanted to keep the wires to a minimum I elected to go with a PocketWizard radio system. I used a PocketWizard Plus transmitter with a big label saying "Push Me!" as the trigger, with everything else covered with black electrical tape. All the switches and most of the writing was covered up to make the trigger as plain and simple as possible. The last thing I wanted was somebody to accidentally switch it off or change the channel.
The transmitter talked to a PocketWizard MultiMAX set in relay mode, connected to the Canon 40-D twice. (One cable for triggering and one cable for flashing) There was a PocketWizard Plus receiver on one of the Alien Bees flashes with a splitter and a thin wire run around to the other Alien Bees flash. (It's important to trigger the Alien Bees electrically and no rely on the photo eye because people invariably use their own cameras with flashes and it would cause the Alien Bees to flash at the wrong time.)

The trigger cable between the two flashes was a pain and I wouldn't choose to do that again - I just don't have enough PocketWizards to do it completely right.
I can't understate how important the "User Interaction" portion of this setup is. It's crucial to keep things as simple as possible because people are thinking about the wedding, their friends, their kids, having fun - everything except how to follow instructions.
Downsides:
Photo Review: The biggest downside was there was no way to review the pictures. Next time I'd like to have the camera shooting tethered and an LCD monitor setup that displays recent pictures so people can see the pictures being taken. I lieu of that I had an X marked on the ground and a box to show the bounds of the frame. (the framing got messed up when someone re-aimed the camera, but it was still close.)
User Tampering: The camera was just sitting out on the tripod and ballhead and was very accessible (although weighted down with a 15 pound sandbag). I had the zoom and focus rings taped over but at some point somebody re-aimed the camera and the blue lines on the floor made it in the frame. Also, despite the sandbag on the center post of the tripod it may have gotten jostled or shifted. People also wanted to mess with the camera to try to review the images but the pre-trigger cable means that none of the buttons on the camera work
Equipment:
Here's everything you should need if you're going to set one of these up like this:
- Camera with remote trigger and flash ability (I ended up at 24mm)
- Tripod with sandbags for stability/safety
- 2 A/C powered strobes (I used an AB 400 and an AB 800)
- 2 white shoot-through umbrellas
- 1 PocketWizard transmitter
- 1 PocketWizard MultiMAX to receive the trigger pulse and then trigger the flashes
- 1 PocketWizard receiver for each flash
- 1 lightstand with sandbags for each strobe
- more extension cords than you would expect
- gaffer's tape
- electrical tape
- painter's tape
- a sign with simple instructions
- velcro ties or cable cuffs to secure cords
- a least one spare of everything